New Laser coming soon bit of Prep work

I have decided that i need a bigger laser now before I bite the bullet press the buy it now button on eBay. I have been doing my homework as a 50watt laser may look the same but are definitely not equal.

I have been looking at about 5 or 6 they are all around the £1200 pound mark they all look like a Chinese laser blue and cream paintwork. But when you look closely they are very different machines. things I have noticed.

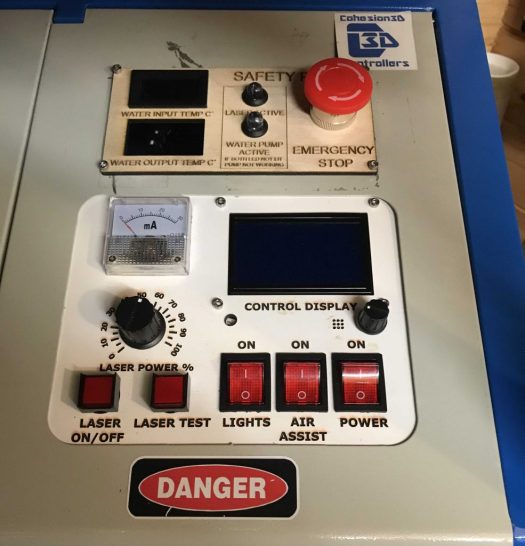
DSP early Ruda  controller / newer Ruda controllers there are  the early monochrome display model or the newer colour display  look identical on the panel.

Ethernet connection or not this is dependent on DSP from what i understand might be a earlier model or it could be different variation of DSP

Manual bed compared to the manual electric bed. I am going for manual electric bed as looking at the model I want there is a Z-axis that I might be able to tap in to make allow it to adjust bed hight automatically.

Now this is a beast of a machine size wise it 1020 x 650 x 630 mm and 102 kg apparently so going to have to call a mate to help transport it to the cave. 

I have just knocked together in fusion 360 a workbench that will be 710 high time I have added castors to the bottom of it as want to be able to move the machine around,  as this makes the ajustment of lenses easier to perform. 

 As I hate doing woodwork I am going to get someone to cut all the lengths of wood for me so I can put it together.

I have made a shopping list of wood to make my life easy

50×47 timber Qty
50x47x650 8
50x47x550 2
50x47x920 4
MDF Sheet  
12x1020x650 1
12x1020x650 ( 100 mm Sq notched out of each corner) 1
Hardware  
90 Degree corner Bracket 8
50 x 50 Casters 2
50 x 50 Casters with brakes 2
A lot of screws.  

I wont be buying this till the new year as I need to get some money together the joys of not being a YouTube celebrity. I have to fund it my self so will be selling off my games collection for arcade machines to fund this new adventure.

New Safety Panel for K40 Co2 Laser part 3

Been a couple of days I know since I posted last part. been fitting in bits between doing other stuff as having a nearly 14-month-old who is just about starting to walk keeping me busy as ever.  I also do not want to disable the laser for long periods of time. as got some gifts to get run up before I head off to Wales for holiday period.

I Started off by cutting wooden panel as will cut perspex one after the system is up and running as easy to swap over. also a learning curve as not cut perspex using the C3D mini board. so will need to runs some testing.

temporary panel for the control panel.
fitted all components bar one of the temperature gauges as was waiting on it to be delivered

after mock assembling the panel. I decided to put cutting disc to metal, so armed with Marker pen I marked holes and inner cutout box. I then centre punched holes before drilling.

ready for drilling and cutting.

I then drilled the 4 x 3.5mm holes and started the cutting process it took 3 discs to cut the cut out.

nearly cut out.

 I then realised As had made it to small as the standoffs for the main control panel and the bolts for the new one were not away enough so going to have to notch the other control panel to fit the nuts but trimmed down the bolts with Dremel so it fits.

now to mount back to the machine.

I fitted the other control panel to make sure it looks right in the machine. i started on the wiring last night by joining the positives and negatives for temperature gauges and running them both off 5v pin off the original power supply. as I have separate power supplies for controller board 24v  and 5v one for my machine lighting, my factory one is not overloaded. I will post a picture of them in action later on this evening as forgot to take camera down the man cave with me last night.  Tonight I will wire the LED’s and the flow switch in. and if i get time i will wire up the emergency stop button as well. will cover all this in a later post. 

Its alive! only issue is the 12v LED’s are too much power drain i might have to swap them out for 5v ones just he E-Stop to wire up now.

need to figure out what to do with LEDs

New Safety Panel for K40 Co2 Laser part 2

Ok Back to the drawing board as someone burnt though memory card ribbon when soldering up a powerless USB plug. (Doh) as i have been having some brownouts I decided to install this kit. will review it soon.

https://www.tindie.com/products/brianlough/power-blough-r/

Never mind so time for safety panel Mk2. just going to order a second temp sensor as then ill have water input and output readings.  Jumped on to Lightburn and just adjusted will post SVG once I have finalised it all.

So tonight little operation on the k40 is to first of all cut another test panel as my 13mm led bezels were a little tight. Will then cut a template panel for cutting the hole in the metal work. before drilling fixing holes and taking a Dremel cutting disk to the panel.  I will be doing this off the machine. vibrations love to mess with mirror alignment.

The wiring of the system:

Wiring up the emergency stop:

The emergency stop is 4 terminal so will have both Live and neutral running through it on each side of the switch. then to the power switch on the main panel.

Wiring up the LED’s

Pump active LED will be wired in line before the laser on/off switch but after the water pump switch.

I will splice the laser active LED to its switch. so when on its lit when off its not will take some images and add them later.

Water flow switch

After looking on Amazon found a cheap one from China will give it a test drive. as will be open when water is running through it going to fit it to return pipe to the bucket.

will wire this before the laser active switch so will cut output if pump or water fail will shut off the laser form firing causing any damage.

Argh, amazon prime was out of stock of second digital temp gauge so have had to order off eBay now waiting on bits before I start cutting up the machine, so there will be a part 3 to follow soon as I have all the bits in.

probably Monday Tuesday next week.