3D Prints That are actually Useful

here’s is a list of tools I have printed and have found useful to help make create and fix issues in my workshop. these are all things I have tested and used in my workshop some have been featured by others but hay this is my definitive guide to what i am using in my workshop at the moment.

  1. Fillet Gauge by TnaTmr files can be found here.

This is a great little quick print for finding out an unknown radius, great for 3d sketching or laser cutting objects.

2. Small Parts Funnel Tray by countspatula can be found here.

this is a must for workshops that have lots of small parts that they need to put in small draws. this is my go-to tool when I get boxes of screws in to sort into their draw project.

nice quick 1hr 32 to print nice and compact to store.

3. Airbrush Wall Mount Holder with Drip Trays & Anti-Tilt by cncartist file can be found here.

in my very small workshop means my airbrush is easy to access off this handy little wall mount.

4. Screwdriver bit wall mount by SaKes file can be found here

use this and its remixes for drill bits and all my quick release bits.

As you can see I have a whole collection of bits easy to access with these wall mounts.

5. Spray can wall mount by Isalvador file can be found here

great for clearing some more spaces off my shelves for more kit and tools got 8 cans mounted behind the cave monster might add more. as a nice quick print, any wall space is a game changer for extra space have since got carried away and done both sides of the racking.

6.Disposable Glove Holderby mkelly file can be found here

12h48 print but saved me around £15 buying one off amazon.

Been meaning to buy a glove holder to mount on the workshop wall, As I have a box of nirol gloves kicking round workshop covid/resin work/ resin printing etc and I found this box so 1 money was saved for the next creation.

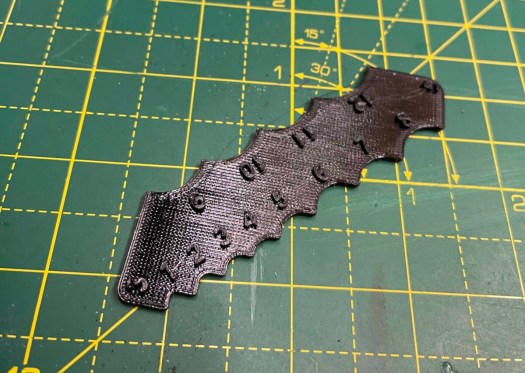
Metric Screw Hex Nut byJigby HDRI file can be found here

was a little slap hand with the pen highlighting number works well.

Love this great for determining what size that bolt you need is within seconds just used this as had a screw was too long by 10 mm so placed it in the guide figured out it was a 40mm bolt and I needed 30mm also identified it was an m5 bolt I required. one for my small tools tray. great for sorting that box of mixed bolts I have kicking around.

Wall-mounted spanner holder8 pcs by DaFed file can be found here

more saving spaces in draws as every spare wall space is used in my workshop as it’s so small. found this the other week love it went for the 8pces version as just needed to clear some space from my toolbox and this worked for me.

there are more bits I’m currently printing and testing which I will add to this list in the near future

How to remix a stl in fusion 360

you will need a licence for fusion 360 I have a free hobby licence that is limited but till i get time to learn the cam side of the program it’s free to me unless Autodesk feels kind and wants to give me a licence. not that they will read this anyhow.

open up fusion 360

the file I am going to remix is this spray can holder.

the file can be found here

Now to remix it or in this case, I am going to create 2 bars for aligning it on the wall by using its original parts as a template. over to fusion

then go to insert drop-down insert mesh

you then can position it how you want i this case will keep it as it is so select ok,

now press s on your keyboard then type mesh you will select convert mesh.

Now select the stl

then hit ok on defaults as all other options only in paid verison.

sketch will now look like this

at this point you can simplify the sketch and make it fewer polygons by selecting segments and removing them hitting delete as shown below

So why do this well on flat surfaces makes it easier to select planes.

go to the sheet metal tab select Create Sketch, you are now going to select face to edit.

select highlighted plane and click you will now see it like below.

I am going to start off making a bar so i am going to hit L on the keyboard and will give me a line command.

as I am using snap to have determined the endpoint where I want to start the line click mouse to start the line

I next go to the bottom right corner of where I want the box i am making to be this will give me a guideline.

like below can now draw the 2 lines needed

close the shape

Now hit enter.

so that is literally the only bit i need for my idea but actually going to 2 as I want the top and bottom lugs to make int to alignment bars. so going to repeat this process and then we will continue.

I am now going to remove the original part from the system as i have the 2 elements i require for the alignment bars as will be easier than removing all the material I don’t need.

then hit del and sketch will remain

now to extrude it on both parts 100mm as think it’s a good size so hit E on the keyboard when selected object

hit enter and repeat on the bottom section of the file now change view please not i have moved them together for illistations.

Now to make the parts you now want to go to utilities tab select make

select the parts and in chose options as 2 body will need to do this twice.

this next part is as I have set my Prusa slicer to open when I make them so at this point you could save them as stl

now the part is in my slicer i am going to set it up for print by changing position before i save it out as an stl.

first to make it flat to the bed i will use the place on face tool F for a quick keyboard cheat

will select the bottom face

part ready to print in this case going to save it as a stl.

click the part then right-click and select Export as STL

save and parts done. then added them to one file ready to print will show more detailed remixes soon

then its over to the printer via octoprint in my case and away it goes as i have doubled up the parts as to racks going on the wall will take 2hrs to print.

parts all done ready for a test fit.

can find my files here do love a quick 1 day project parts are in to finish off the cr-10 so that should be up soon.

World Book day fun

So my sons harry potter mad and wanted to dress as harry potter for world book day, long of the short we had lost his harry potter glasses.

So being the creative type and someone who loves to recycle designs I found an old harry potter prop I had designed for photos and decided to make some wooden prop glasses.

my original design

I then made the first pair of glasses up by removing the outer cut line and then using a square and weld tool I added some more girth to opposite end of the glasses offset the outer edge by 3mm and then notched it using the vector path edit tool to add 2 reference points and then converted notch to a path. then matched the outer edge of the glasses and made 10 x 100 mm rectangle as I had done a ruff measure of my son’s head. to the top edge, I used a circle tool to make a circle in the top edge of the rectangle then off set it inward by 10 mm to make the downward curve for behind the ear I then added a 10mm square to add some length circle to round off the bottom of the arms using path editor joined all 4 parts together and removed all bits I didn’t need. thin I did an offset inwards and set it to fill. then did a 3 x 5mm rectangle and placed in to cut path and i used the convert to path tool and inserted it in to the path. time for the first cut of the design. forgot to capture the screen of the original design doh.

it worked but was loose as can be on my son so went back in a remixed it a little by shrinking size by 20mm on the arms and smoothing all sharp edges I also made a bridge by using path editor and adding a curve in the middle top and bottom.

design all done.

back to cutting now fits perfectly one happy boy who had it on all day,

A nice quick one. love the joy of making my boy happy.