

As my pc died over Christmas I have been putting this off for a while but now want to make some bits and the CNC will be perfect for this so I am going to get the machine working. and do some more modifications to it on the route. this is a 3040T Chinese milling machine.
I am also going to try CNC carving and milling with fusion360 as prior I have used other packages but seeing as fusion 360 is my go-to for design. as I learned on AutoCAD it shares a lot of similarities. more on this later.
The Story so far
This is so you don’t need to go back through the site. I brought this machine thinking CNC was easy as 3d printing and laser cutting it’s not. had the machine collecting dust for a year. during lockdown made an enclosure modified the machine to add some custom made end-stops and got rewired it and had a light bulb moment. then made a custom wast board with threaded inserts.
So as I wait on components from china for the cave monster time to clean out the enclosure and add make some bits to make my china CNC machine great and teach myself some more about CNC.
the spoil board is where I got to last time before the crash. and was working on a custom dust shoe. then other projects took over so I’m now going to start to make more stuff on my machine. So this I blog of my progress. see the photo montage below.


Time to clean my machine
As the machine has been sitting for a year since I last switched it on.
Before I get started getting a feeling I am going to need to clean the cooler water for the CNC machine, Ok not terrible but needed a cleand as organic material in the bucket. out with the old and time to clean the bucket fill it with some a 50/50 mix so 5L anti-freeze and 5L of deionised water as then bucket should keep it nice and clean going forward. now to pump it through the system see the pink in pipes and check for leaks, no leaks.
Now I have a clean machine I now to set it all back up. so over to the pc well remote link to the pc as it’s cold outside. so installed a remote desktop on the cave computer and have the machine running as the control box is on.
The Setup
Now to find my note as need to revisit them and get all the settings plummed back in.
Have installed mach3 need to install a plugin for the control board and MPG luckily have saved all this all in my dropbox so just drag and drop it all into my mach3 folder.
next up remembering pin set up so port 3 pin 1 = estop pin 2 = home switch pin 3 = limit switch and pin 4 = probe plate. so into inputs check there all right and enabled they are.
following the Chinglish guide, I go through the motor tuning and select all the right bits.
Config menu ports/pins

Next select input signals copy below


Now over to output signals tab.

Motor tuning for x y x follow below

now for A and splindle

now spindle

dont for get to hit save Axis settings after each change.
now one thing i forgot to set limits and homing that will mean your homing in revirse so on x and y dont forget to home Negtive only on x and y and your golden i have also set up the soft limits to prevent from crashing.

now to home the machine hmm it all z homes right x and y
adding edge finding and z zeroing tools scripts I highly recommend checking out
https://www.youtube.com/user/sunny5rising
The legend that is Charlie Sarsfield followed his instructions on adding limit and home switches and his tool zeroing and edge finding scripts and install them
and now to make sure the machine spins and does what it’s meant to all works fine will be adding a new calibration plate so will test the scripts work like a charm
So the machine is back to working but me being me time to modify it some more.
Upgrading dust extraction system
before I start running some projects I am going to revisit the dust extraction as it’s okay just not brilliant lots of leeks for dust. so I’m going to make this modular and dust-tight hopefully I have added some fins to my dust shoe so it should suck all the dust-up am also adding parts so that vacuum tubing that will go through a flang that I can plug my shop vacuum in and out of. so over to fusion 360 to model the flange.

now to test fit that before I make the inner flange. well it sorts of works i forgot to attach the inner tube so is floating so now making 2 outer tubes one so made them box the 35,2mm inner and then made so it will fit over the centre tube then enlarged it out to 36.5 mm with a 45mm outer


as for the tube end, I have made an inner opening end for 39.5mm and the flange end made it 35.2mm have then glued them to the flange. and screwed it to the enclosure. I forgot to take pictures doh here it is partly assembled with a vacuum hose attached from the vacuum end.
Have 3d printed a nozzle for the 40mm vacuum tube that I have a 5m length that i brought previously so I could extend the hose for the shop vacuum. I found a design some time ago and had test fitted it so I have cut down some vacuum hoses for the internals of the enclosure now going to print some clips to secure the hose internally to the roof of the enclosure.
all plummed in have ordered a new dust shoe from that has arrived fits well got to make adapter tube up infusion nothing flashy inlet side is 38.5mm and output of 36mm

2hrs later and it fits like a glove just need to trim down the hose lenth and install clamp

as now can plug the shop vac in and out. I might upgrade that too as is not too powerful think that will be next month’s shop if I feel it needs it.
Clamps
First up I needed clamping arms as I had a few issues with the tape method that everyone raves about. i might revisit this
so found some CNC clamps that I saw teaching tech use on a video so going to give them ago I will also test out some style ones as well as I need different ways of clamping down materials.

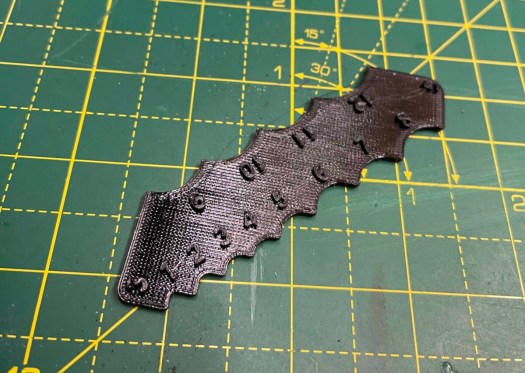
So new untested eSun PETG filament loaded into neon orange and away we go will check seems to be laying down fine layer 5 and only a little mess on the bed will check back later.

have now printed 3 diffrent styles will be testing them all out once I have the machine up and running. as we have some nice weather coming over the next few weeks willl get some diffrent materials as well.

I will be testing them all out I have a feeling the big one in the middle is too big for my hobby CNC machine.
have also designed my own one as well will do seprate post on that as this is already gone from being a quick post to entertaing me to another
Zeroing tool upgrade
Next up going to change my zeroing tool for a new one I have purchased off eBay.


as I was clever and used the power connector just need to unplug the old one and swap the wiring over now. All done and the magnet works well no hassle of crocodile clips well worth the £30
now back to the automated edge finder and tool z hight scrips now I know the XY thickness is 10mm and the z is thickness is 12mm so need to change the variables as shown below.


time to test the system

test complete have moved the plate off material and hit go to zero not bad going it a little off I didn’t set the tool diameter so that might be the reason it’s away from the corner.
Setting up Chinese CNC with fusion 360
Now I could do this using a different method as having used other CNC design software in the past and still have access to it but me being me decided I would go another route as keen to learn more about fusion as it is more than just 3d modelling tool.
So time to put some scrap wood in and see how we go, going to start with something simple as I am going to use my go-to program for design to try the manufacturing side of the program that I have no experience with so going to make a pocket in some wood with a simple part to see how it works.
as with anything design related i need to take some measurements so i am going to start by measuring my scrap of pine in the machine, I make it 200mm x 200 mm x 12mm then made a note of this so when it gets to it the program will know how big the piece is. i am going to machine is.
Next, i will need to make a list of tools as all the sample tools are developed for big milling machines with quick-change collets one day when I have a big workshop I will get a bigger machine. but for the time being, mine is only 3040 well actually it’s less than that more like a 3727.
time to gather some data for tools so I have ordered a set of six tools from china and with that i have the following data. so going to add them to the system along with some end mills and facing tools that I have in my collection.

I have also found prior information on some other bits I ordered in the past so been collecting them in a file to add as well.

The tool adding can be found in utilities under tool management

Click library then click the plus icon you will be greeted with a tool selection screen

you will be greeted with a tool selection screen screen

so in this case will be adding a 6mm end mill so I select the end mill.

Time to give the tool some description vendor name as I don’t have a link or id won’t add them.

No to add cutter detail so I have this information on the tool

I have copied speeds from another package as the default 5000 speed on the tool was mega slow. so have now upped it to 16000 and have calculated a minim feed rate 17.882 meters per min now running it 650 feed rate as 18 was way slow for wood.

now hit ok as don’t have a holder template for the depth of tool 0 as I don’t think it’s necessary as will zero tool after each tool changes this is more for an auto-loading tool machine perspective.
tool set up complete
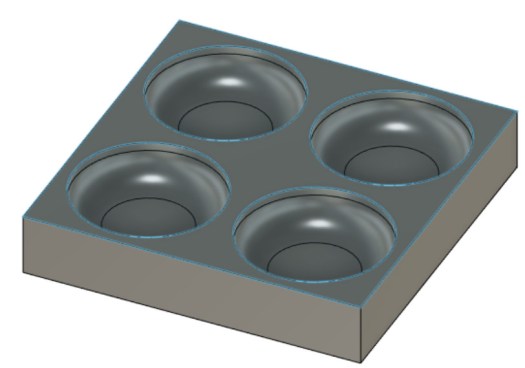
So infusion I have made this test part nothing special just make some pockets and will do more if it works this is a stage of learning so let’s see how it goes.

Now to switch from design to manufacturing add the tools then let’s see what they do.

Now for the set up this did seem a little daunting in the beginning think I have figured it all out I am going to only use one tool as this is experimental.
Click the setup button I am first going to move the origin from the centre to the front of the design is the same as the stock size it’s easy just click the dot on the front. as show below

now the stock tab I have changed the stock to be relative to the box with no offset.

Next to the program number and comment.

now we have this set up I am programming in a 6mm end mill so adding to the tool library.

first up going to perform this in 2 processes first am going to be pocketing the selected areas in the design then I will boar out the corner holes.
so to start going to the 2d pocket will then set the tool as my 6mm endmill. I will then select the 5 areas that I need to pocket out. click ok next under the 2d tool panel i selected the boar function with a 6mm tool selected each hole all 4 of them. selected ok.
I have run the simulation and it all looks like a good time to test it.

Time to post-process it then load it to the machine. and zero tools find the edges and we should be good to go.

Ok, the .tap isn’t recognised as a file in mach3 but I duplicated the file and changed the extension to .gcode will now load this into mach3 and see what it spits out.

loaded as you can see thinks the part is top left corner need to zero the tool to material height and find the edges using the zeroing tool and edge finder.
right zeroed the tool correctly and fount the edges got to love the auto edge and z finder. as you can see the image has been generated to fit the stock

right that’s worked will run the test programme and see what happens to wish me luck. Ok, that failed as it went in the wrong direction. I think the Origen is reversed going to change that in Fusion 360 then try again.
ok, I am a tit missed out on something from setting up in the homing limits in mach3 doh so I needed to tick 2 boxes. now homes correctly. as I am here also going to set up some soft limits so this all works right.
Away we go slow but steady think I need to mess with the speed and feed as it’s in and going down yay and the clamping just failed.


As I have caught covid again in bed writing this so have had some time to reflect on the failure of the first run. back into fusion 360
go tool management and time to set some parameters so Spindel speed upping to 16000 and 650 meters per min feed rate I have also added multiple depths so it will now not go down 18 mm and try cutting out so now have set it to 5mm per pass switched to 2D adptive clearing.

let’s try running this test program recalculated with new clamps fingers crossed, going to use the same blank as woods not cheap and being pine won’t kill me on the dust.
first, to zero all parameters so out with the new zero tools and find the edges going to jog the too over the zero probes I have a magnet connected to the tool then on mach3 hit tool zero. the probe will go down and touch the plate touch and retract then go to jog x side of the tool and go to offset screen and hit auto x will move to the x-axis side of the tool and retract repeat on Y size using auto Y same will happen tool will move to the tool and retract system all zeroed now to remove tool and magnet off a bit. hit zero and the tool will be sitting just above the bottom left front.


Now to start the program away we go.
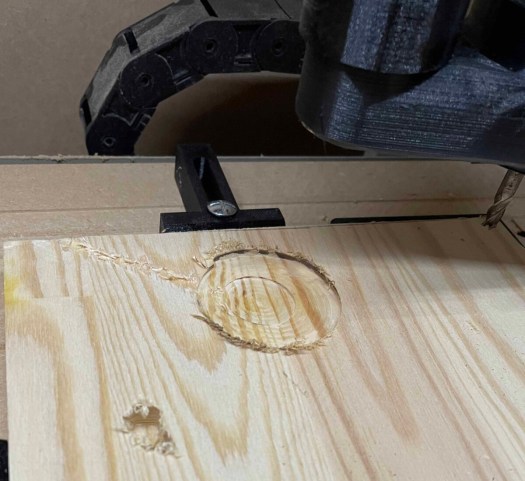
so back in to fusion as my gcoding days are long time ago so i am letting the program do the legwork. as you can see scraps had some battle wonunds not to self dont go to zero all when tool is down in the wood hoping it will be machined over have stopped the job. time to restart it. as the rate it was running would have taken a long time machine. now upped feeds from 18 to 650 mm/min so will now run the final 4 pocket first one turned out well.


so have removed one pocket out of the design i think will run some other processes on this modle as i go but will attach the dust shoe as well as could feel dust in the air. but think i am going to leave that for another post as this has dragged on all week.
Now that I have figured out the basics I want to try running some projects carving from an STL file. making a 2d PCB and then using a bit to drill make the holes and engraving tools to make the tracks on single and double-sided copper PCB board, make some complex parts out of aluminium and more. these will be broken into different learning posts as don’t want to bog down this blog so will be another post as I learn more about both the software and machine.
Parts Incoming just had a bumper instalment of bits. so will be a post about this soon as want to make this a quick to set up stable.


You must be logged in to post a comment.