Review of the TS-100 Solider iron

not shown PSU and stand extra tip also shown.

This is hands down the most useful soldering iron I own. its lightweight construction it’s not wireless but it is versatile as well as runs off 12-24 volts so RC batteries. heat-up time in around 15 seconds or less depending on the power source.

I had an old Dyson dc-31 22v battery kicking around that would not work with the Dyson so brought some tx60 connectors made up a lead with about 30cm of mains cable soldiered it to the male tx 60 connectors and spade crimps in my battery connections I then plugged it in 11 seconds 25c to 300c wow.

my quick and dirty portable battery cable works like a charm.

fully programable has sleep function if left idle and firmware is upgradeable via USB connection mine came with the latest firmware installed so haven’t had to do this

It as has 7 different types tip available. i have just brought a second tip so I have one for different applications.

prefect for working in the workshop.

the reason this iron is so good is down to the digital heating element being in the tip and it using new technology that is found in more high-end equipment.

it was worth the reasonable price tag of £41 for the kit that included 1 tip, power supply, soldering iron stand, RC battery cable for use with tx60 connectors, and some solder.

In conclusion

it outperforms my soldier station and my Dremel portable gas iron and my cheap battery soldier iron am actually thinking of removing them from my tools here in London as don’t need them taking up space. might just replace with a laboratory power station.

PROs:

Light weight

Good construction

Easy to use OLED screen and 2 buttons

Upgradeable throught usb port

12-24v vercilty up to 65w of power.

5.5 x 2.1 power connector

RC battery conectivity

CONs:

tips are expensive £13 UK £11 Chia if time delivery time is not urgent.

Fun with different designs of wall-mounted spoolers

have since moving my Prusa mk3s to its new home on some racking been having issues finding a good wall mount spooler for it. so have been testing some from Thingiverse and www.prusaprinters.org that will fit into my set up. There might be more if none perform right.

Wall-mounted Spool holders tested.

Wall-mounted drybox by Ondřej Stříteský

This is a good 36hr print a really nice design

16hr print start
16hrs later.
rods and screws all installed as well as plastic membrane

The buidl:

Now as i have some 8mm tubing and all the bits have arrived from aliexpress time to build the box and see how she performs.

the print time is 36 hrs per box one failure as my new filament sensor was not turned on doh. hence the 2 tone box. still dialling in the printer.

funny looking humidity gauge thanks aliexpress.

Oh, Just opened up my humidity monitors from aliexpress turned out to be temp gauges so have ordered 5 more from bangood hope these ones are right but for time being they are going to be temp ones till bangood deliver.

the build come in 2 x 16 hr prints for each side of the shell. you are going to need 4 bearings and 2 x 100mm aluminium 8mm tubes 1 x M3 x 5mm. 2 x M3 x 10mm. and 2 x M3 x 30mm. and a panel mounts humidity meter bag plastic from a ziplock bag and some silica crystals to dry out the box.

the 8mm tube is a nice tight fit so i got some sandpaper and smoothed each end to allow bearings to fit better. then pushed them into pockets in the base of the dry box I then fitted the lid and added the 2 x M3 x 30mm bolts to the hinges and screwed them in. the M3 x 5mm holds on the lid catch i had to ream the channel that the plastic nub fits into slightly to get a nice tight fit. i also added another m3 x 5 mm to the lid to help it lockdown this was not mentioned in the guide but works well you then use a ziplock bag to cut out a rectangle window for the filament to go through this is then bolted down using 2 x M3 x 10mm bolts. as i have bags of silica gel i have added 2 to the box.

I then positioned the box to were I wanted to mount it I then use 4 self-tapping wood screws to fit it to my wall behind my printer.

Time to test.

very stiff on pulling out filament going to do some more testing later it’s not working right might be the cheap bearings from china. will play some more with this but taking up wall space. so going to remove it and test next design.

Conclusion:

my issues might be the cheap bearings i used. so will revisit this design shortly as like the idea of having my filament stored during our winters.

Next, i tried this nice looking spooler

Simple Wall Mounted Spool Holder by 3dprintaddict

This was a 9hr 30 min print and works great on standard spools but not on Prusa spools are a little wider than smaller 1kg rolls.

The build.

take it off the print bed take 2 self-tapping screws and screw to the wall ready to go.

Conclusion:

standard 1 kg roll of filament.

Just to small for my Prusa filament spools. will use it on another printer in the future.

Prusa 1kg roll of filament doesn’t fit.

Filament Spool Wall Mount by dermatin

As this one has been designed for Prusa printers i am hoping this will work for my set up its a clever system going to take 3 print runs to build have finished printing the base around 6hrs to print and am currently running the legs that a further 9+hrs then i will do the spoolers 9+hrs. you are going to need some parts for this build luckily i have all the parts from the days of printing fidget spinners. 8mm threaded rod from previous projects.

Legs are currently on the printer did the base earlier.

Parts list.

  • 160mm M8 Threaded rod.
  • 4 x 608 bearings.
  • 2 x M8 nuts

The Build.

all built up ready to mount.

In my case, i had to cut down a 1m bar threaded with my junior hacksaw. then ran the first nut to end of the bar. insert the 2 legs into the base ad 608 barings to each end of the spoolers. thread the bar through the bearings the legs and add the second nut tighten till not to much play one the spoolers.

attached mine to the wall with 3 self tappers and then covered with the hex caps.

fits the space perfectly

Conclusion.

This is the one for me as holds 2 full-size Prusa filament spools and easy to swap in and out. will be testing this over the next few weeks. as I am installing a heater in the next few days i will not need to have a covered spool.

Right finally go this out after a few months of issues and printer problems i can see the light.

Review: Ricoh SG-3110DN Sublimation Printer

As with most printers this started off life as a standard printer well in my case this is a second-hand printer that allows me to do a lot of promo bits for the cave and for my day jobs the joys of being someone mad enough to run 3 jobs the family business/Crafting business/Man Cave, blogger. The wife might argue that the blogging bit is no a real job but i beg to differ.

I got a great deal on a second had printer load of mugs and some sublimation printing paper.

drove 30 mins out of town to grab this kit and well worth the money i paid a lot less than the printer alone would cost.

So why the Ricoh printer well in my case space is premium and this is a nice compact unit the fact its ink-based refillable cartridge system is a doddle to install and use.

its great machine to learn on as there is a lot of information on this printer on youtube so lots of setting up guides.

as new to this being a bit of a learning curve but getting there finding heat and time is the hard part of sublimation printing.

but once you have got your head around that it’s easy. i am getting there slowly but think i have now found the sweet spot on the printer side just to get the heat pressing parts

pros:

  • Small and compact A4 printer.
  • Easy refillable cart system.
  • lots of guides on how to use this printer
  • aftermarket inks cheap

Cons

  • sealed ink cleaning bin single-use only have to replace so far looks like will last a long time.
  • issues with windows 10 and drivers have had to run off the LAN
  • inks are expensive if brought off sawgrass

I would recommend this machine for someone who wants to set up something out of the box without having to reset chips and other complications

Review: Elegoo Mars UV SLA 3D Printer

banner
New toy for the man cave.

I have been after one of these bad boys for an over a month but they are hard to find in stock as in short supply in the UK as so popular as the 3d gods have been reviewing them. elegoo support on amazon tipped me off of stock returning and i managed to snag the last one on amazon. time to review it.

What’s In the box?

nice compact box with lots of foam to keep it all safe.

Very impressive packaging from such a cheap machine after removing the foam you are greeted a with a box labelled tools and the printer.

still more foam but can never be too protective.
tools and power supply

after removing another layer of foam you will find the print plate lose encased in foam. i finished unpacking the tools and printer. You are greeted with a nice easy to use manual. so what’s in the box?

  • Hex driver not sure what this i used for probably changing the vat screen
  • Printing plate.
  • Snips for cutting supports off.
  • 2 x Hex Keys 1 for locking the print head in place the other must be for maintenance.
  • Measuring jug for filtering the leftover resin into before pouring back into a bottle,
  • 5 Face masks not sure the need for these as resin does not pong.
  • Paint filters for straining used resin through so you can return it to the bottle.
  • Some spare nuts and screws just in case you lose any.
  • Nitrile gloves couple of pairs will need more
  • 3d printed 45-degree drip tool.
  • Plastic scraper for removing prints.
  • Powerpack with local plug in my case UK.
  • Instructions
  • USB Key with rook test print instructions and slicing software
All thats in the box

What’s not included.

Now you will need to buy resin separately i have gone for the Elegoo standard resin 500g transparent green for £20 off amazon. going to order some other colours soon.

You are also going to need some bits to clean and cure the print afterwards. After watching some videos i brought a pickle jar airtight this comes with a drip tray some 91+ % isopropanol alcohol to clean the print, some UV light to cure the print this can be sunlight.

I have ordered a UV light and turntable that i will make a curing chamber in the future will be an upcoming project.

The Setup.

This is probably the quickest setup i have ever done on a 3d printer.

  1. plug in the printer and turn it on makes a beep and its ready select settings and manual raise the z-axis by about 100mm 10 presses on up button.
  2. Get build plate loosen 2 grub screws and attach the build plate to the z-axis
  3. Press the plate levelling button the plate will home and move up and down a few time then tighten the grub screws. plate is now levelled.
  4. move build plate 100mm up the z-axis.
  5. Check the uv screen is working this step i skipped as it was late.
  6. fill resin vat to 1/3 full insert the USB key and press the printer button to navigate to rook print and press play.
  7. Cover the machine, with UV cover i sat and waited till i heard the pop sound this was first layer being taken up by the build plate.
  8. Come back 4hr 30mins later and print will be done i came back next morning.
test print started 11:30
checked on it about midnight ish

The Morning after

Curing the print.

now this is the dangerous bit and requires cloves do not handle resin without gloving up as this stuff is toxic. i also put safety glasses on as just don’t want to risk it.

letting access resin drip of the build plate.

using the supplied 3d printed bracket I placed the build plate on it to allow any access resin to drip off the plate.

after 10 mins i came back using the scrapper i gently took the prints off the build ad plate put them into my pickle container filled halfway with isopropanol alcohol shook the sealed jar to remove any access resin.

In the uncured prints go. 10 mins in 99.9% alcohol

i then put the prints outside for 30mins to cure.

marks from getting it off the build plate

The result.

so crisp 0.05 layer hight
look at the detail just wow

Wow I am impressed with this printer yes it’s a bit messier than an FDM but the quality of the print is amazing going to start my first project to see how it handles a model off Thingiverse.

Summery.

I would recommend this printer for small quality prints it’s quite easy to use so far will review the slicing software shortly. as its resin would watch a load of videos first as safety is key.

Pros

  • High-quality prints.
  • Easy to set up and use.
  • Not too smelly.
  • Compact unit.
  • Offline printing.
  • Well packed.
  • Price.

Cons

  • Risk of harm from resin.
  • The power switch is on the back
  • the USB slot is on the back
  • Getting material off the build plate is a little hard

All in all happy with my purchase can see it being a good fit in the cave. would recommend it to everyone just finding them has proven to be a challenge as in sort supply at the sale price as people are buying them and marketing up to £400+ on ebay.

A for future mods to the machine, I have a USB extension lead will try seeing if it will take it as will then mount the USB at the front and have a led extension with an on/off switch will see if i can then add the on/off to the front of the machine. so minimal mod to make it great will cove this later. will post the first project later once it done.

Review: Freesub ST-3042 3D heat press

After a lot deliberation about what heat press i should get, i decided that the 3D press was right for me as can do more than a press a T-shirt and do costers.

Which is ironic as my first job is to do some costers for a trade show for my other business.

On my return from wales disassembled my cr-10 and cleared space for my new toy

ready for new toy

Got to work on Tuesday after a week away to be greeted with big-box do love new toys.

now to unbox it so what’s in the box.

  • 1 x set heat gloves
  • 2 x 11oz mug wraps
  • 1 x 15oz mug wrap
  • Spare vacuum sheet
  • Spare Tubing.
  • Power Cable
  • Manual.
the beast of a machine.

All and unpacked and removed all plastics and packaging fired it straight up and through i would test out a coster fired up the tried to test vacuum it but just buzzed nothing happened.

I then realised i had to connect vacuum tube to nozzle now vacuums. fist test run didn’t sublimate to well as was not making a proper seal.

I have since watched a video and no know i have to make cuts around the outer edges of the paper to get it to make a good vacuum seal so that was my next issue solved.

In the video i watched it showed 4 costers being done at once 180c for 4 mins. so i tried that It did sublimate but colours are washed and not right.

Ment to be a navy not purple not bad second attempt.

I think this might have been as i was running 1 only might need less time so tonight i will be running the test again 80 seconds on the clock and different print settings.

Arg no joy now think its pressure issue with the machine will do some more testing on this tonight as i have read over the manual and want to check vacuum pump as was mention about removing water. as i printed 2 costers to a sheet second one i applied to a mug with 180c temp and 180 seconds now its worked colours are right but fuzzy so going to reduce the time as read this is caused by too much time to see if i can get my sublimation temperatures/times right.

Not good overcooked but great Colour sublimation and loads of dimples on the back of the coaster

Finally cracked It had some shit coasters that don’t sublimate well as just tried with some name badges 185c 4 mins can do 6 at a time no issue Colours came out well

I know it was late it’s not straight

I also tested a metal bottle opener worked well I know it’s not straight was 2 am in the morning

This is a great machine now that I have figured out my issue being cheap coasters. As with my sublimation journey, it’s been a bit of a learning curve.

Summery

This a nice solid build Machine with a wide range of uses for sublimation. It’s very user-friendly and easy to set up. Heats up to 180 c in around 5 mins or less. I am happy with my purchase

Pros

  • Silicon moulds for range items ie phone cases mouse cover travel bottles, mugs.
  • Compact uni
  • Vacuumed seal
  • Easy setup and use

Cons

  • Not cheap
  • Some noise when running

This is for a creator and can see it being a useful part of my side business. now i know its just the issue with cheap coasters. I have now found a reliable source of sublimation blanks should be plane sailing.

CNC Chinese 3040 mill Build and Review

When building a workshop this one of them tool everyone should have in a dream scenario.  I was browsing facebook and sore one for a great price way cheaper than I had seen it anywhere else so was a no-brainer clicked and bought one.

The Drama:

I thought was too good to be true and in this case, it was.  Lucky I had paid via PayPal and managed to get a refund of the 299 NZD.  Do not buy from buildotory.com its a con and there is a whole group of people who did lose their money on Facebook.

The second time around I found a smaller version for a reasonable price from a Chinese seller in Germany.

3 days later 1 box turned up was a little worried as I had read it comes in 3 boxes, I contacted the seller who assured me the all 3 had been sent.

the next day 2 more boxes turned up. heavey boxes at that a whacking 53kg in total so walking them from my office to the car was a dumb idea that I did.

The Build:

As the wife was out with our newborn or coming back from wales I unpacked the machine in the house.

As usual with most things you order from China, there was no instructions bar a 350 meg file download link. this contained mach3 set up guide. a video that shows him setting up the machine not building it.

Don’t panic! it’s not that hard to set up 4 large hex bolts to attach the gantry to the bed of the machine then some small bolts hold the wiring chain to the base and 6 screws to hold the 2-bed skirts and cable chain runner to the frame.

After this you will have to connect all the motors with there connectors then it’s as simple as running the wires to the controller box. these wires are labelled X, Y, Z and A if you have the 4th axis like I do.

you will also need to connect 2 hoses for water cooled spindle if your version is the 800w the low rated versions are air cooled.

Software set up:

I downloaded the file that I had been emailed via seller it came with pdf on settings for mach3 in chinglish, it also came with Mach3 software in English and Chinese with patch files,

I followed the instructions and plugged in the USB cable to my laptop for time being.

once installed and all settings adjusted I tested it out. It alive have spun up the 800watt spindle and controlled it on all axis bar A as not installed as yet.

Things to note:

According to the seller, this will not work with 64bit versions of windows it does and windows 10 think this disclaimer was written about parallel port versions of the board which this isn’t.

The Near Future:

its now gathering dust in the man cave until I have some moments to build an enclosure for it. being as I will mainly be using for wood it’s going to need one as I don’t want to get dust every ware in my small man cave. Update I have ordered the boards to make the enclosure so should be up and be running soon.

I will be building it a pc to run mach3 as a stand-alone machine with vnc viewer on it. This is so I can remote in from master pc in the man cave will make easier for live stream setups in the future. Update Built PC just need to test it with mach3.

I have already taken the control box apart to have a look at the controller board.

From looking in the box  I can see there are spare pins for touch probe and end stops will be adding them soon.

see wiring diagram I found on the mach3 controller installed in my control box.

I have also ordered a probe to install and connectors to wire it up will install it soon.

I will review the machine soon as I have had some free time to set it all up

The first Project:

I have already designed a waste board for it as teaching myself CNC/CAM design as it simple to pick up as I already know how to use fusion 360 which has a cam package as part of the software. there are also other great bits of software out there.

Prusa i3 Mk3 Review

Finally, have had five minutes to put together a short review of the Mk3

After a fair few months, my machine arrived all boxed up. the PSU was a little dented soon pulled straight with needle nose pliers but apart from that arrived in good shape.

I decided to build this indoors as the bad weather and space is a factor when dealing with 100s of parts.

this is not my first Prusa kit. the last one took well over 8hrs to build and I did this over to days and then there were a few hrs tinkering to make it print well.

after seeing a few live builds from some of the youtube celebrities. I started it took a lot less time to build than the last one think I had the machine build in around 4hrs. had to do this over a fair few days though as little one had a cold and was in need of daddy time. I blame this for me messing up a few steps. will talk about that later.  the manual is epic and very well documented. I would, however, recommend using the online manual for bigger pictures and comments from users are always helpful.

after the build, I flashed the firmware to the latest version as there updating and fixing stuff all the time.

turned on the machine was greeted with would I like to run the wizard to configure my printer.  said yes it runs through fans bed and got to x then failed with the axis being too short. this had me puzzled for a few days. changed belt tension made sure every this was aligned.

turns out that I had missed a step in extruder assembly and inserted 2 bolts the wrong way around and was missing a few square nuts. hence why I blame macs (my son) as he cannot answer back lol.

once this was corrected ran the self-test again and it flew through without issues.  then calibrated z without an issue.

first layer calibration was a little awkward but think this was down to a firmware issue. as I have now updated firmware and my issues with prints not sticking seems to have gone away.

I printed an exhaust vent for my k40 laser it took 16hr to print. I did this as my first print as wanting to get as much done in a weekend so I can keep articles coming on the website.

I have now printed several of the test prints on the sd card see the images below and as always floorless.

I am yet to test out all the functions of the printer like power panic and was having issues with stepper motor crashes so turned it off as was messing up prints. I have not tested any of the functions since last firmware update. will add my findings to the review once I have tested them out.

my thoughts on the printer so far.

  • price is mid-priced but worth the money for the support and the features
  • quality is great every part fitted and there are spare parts just in case you drop that vital screw or nut.
  • easy to put together great instructions if you read them all Doh.
  • advanced features crash detection power failure and filament sensor I am yet to test but autoload works well just wish that they would implement the self-heat option when inserting filament.

I would recommend this to any hobbyist who is not experienced with 3d printers who want to learn and have a printer that will work out of the box without having to fix issues from poor manufacturing. this printer will produce high-quality parts in a lot of materials.


K40 Setup and review

I have wanted a Co2 Laser for some time for the man cave as it’s a useful bit of kit. For engraving and cutting materials.

I got a great deal on what is known as a K40 laser these lasers are from china so don’t expect good quality.  If you do your research, you will know what you’re getting in to before you buy.

It arrived. Well packed in massive 42kg box.

What was in the box.

1 x k40 laser cutter.

1 x extraction fan. (rubbish Quality binning and upgrading)

1 x extraction tube. (rubbish Quality binning and upgrading)

1 x water pump. (rubbish Quality binning and upgrading)

1 x usb dongle. (Never used as didn’t use the supplied software)

1 x cd with Chinese cutting software. (Never used as didn’t use the supplied software)

1 x tube of something think its silicon

1 x double sided tape. (meant for mirror alignment)

What you will need to get this working is a bucket and some distilled water as you will need to keep the laser water cooled.

The setup.

You will need at least 5L of distilled water connect pump to water inlet tube and place in bucket with distilled water place the out let tube in there as well. the pump is rubbish some times works some times does not so have to tap it with something heavy.

Install extractor fan and attach extraction tube. again rubbish will need to be upgraded will cover this in a later post once have printed a new exhaust adapter

There is a earth connection that I didn’t use as being in the uk our plugs are earthed.

Then plug it all and switch on.

Make sure you set the dial down before testing the laser as up can possibly blow the laser tube.

Placed some plywood down and hit the test button the gauge registered 5ish mA lifted the lid nothing no marks on the wood. Left lid open and did it again saw the glow of the tube. So knew it was working.

Figured the mirrors were not aligned. Spent the best part of an hour looking at youtube videos and webs sights that all talk about adjusting mirrors but don’t talk about what screw does what.

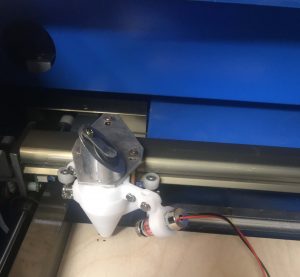
I decided to sleep on it oh and a have baby. A month later having some man time as wife was away with our son. I came back from a few days working in Amsterdam to the house I decided to bring the laser in the house and work on it as the cave is cramped to work on big stuff. After 40 mins with the aid of some 3d printed parts I got the lens and mirrors aligned at last.  Link to 3d printed parts off thingiverse.com. i also brought and added a 3d printed air-assist and laser pointer for showing were laser was pointing at on the materal got this off ebay.


Moved the laser back to the cave and ready to action.

Now I bypassed the Chinese software as had been able to do some research on the machine. I had invested in a 3d printed air assist and laser maker. I also had installed k40 whisper instead of the hacked version coral draw and coral laser.

Cuts and engraves like a dream. Well worth the money.

The future modifications.

As someone who like perfection I have dumped some money on my machine and over the next few months. I will be upgrading the machine.

List of upgrades

New mirrors all around as the quality of the Chinese mirrors are ok but not the best quality. (Done)

New light object air assist and cutting head and cutting lens. (Done)

New Control panel for more functions.

Adding Motorised adjustable bed (Built) wiring loom and board upgrade first.

3d Printed exhaust vent

New exhaust fan

New water cooler pump

Adding Flow and water temp meter.

New controller board and software.

Adding lcd screen

This will be done over the next few months as have limited amount time as family time comes first.