
you will need a licence for fusion 360 I have a free hobby licence that is limited but till i get time to learn the cam side of the program it’s free to me unless Autodesk feels kind and wants to give me a licence. not that they will read this anyhow.
open up fusion 360
the file I am going to remix is this spray can holder.
the file can be found here
Now to remix it or in this case, I am going to create 2 bars for aligning it on the wall by using its original parts as a template. over to fusion
then go to insert drop-down insert mesh

you then can position it how you want i this case will keep it as it is so select ok,

now press s on your keyboard then type mesh you will select convert mesh.

Now select the stl

then hit ok on defaults as all other options only in paid verison.

at this point you can simplify the sketch and make it fewer polygons by selecting segments and removing them hitting delete as shown below


So why do this well on flat surfaces makes it easier to select planes.
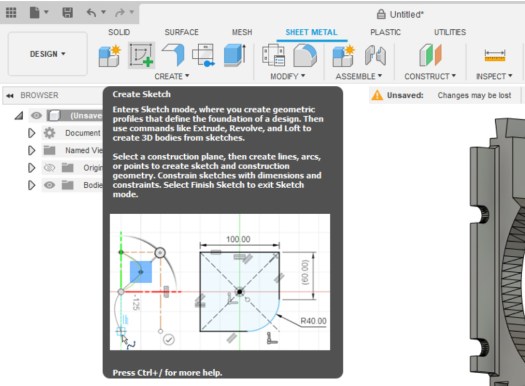
go to the sheet metal tab select Create Sketch, you are now going to select face to edit.

select highlighted plane and click you will now see it like below.

I am going to start off making a bar so i am going to hit L on the keyboard and will give me a line command.
as I am using snap to have determined the endpoint where I want to start the line click mouse to start the line

I next go to the bottom right corner of where I want the box i am making to be this will give me a guideline.

like below can now draw the 2 lines needed

close the shape

Now hit enter.
so that is literally the only bit i need for my idea but actually going to 2 as I want the top and bottom lugs to make int to alignment bars. so going to repeat this process and then we will continue.

I am now going to remove the original part from the system as i have the 2 elements i require for the alignment bars as will be easier than removing all the material I don’t need.

then hit del and sketch will remain

now to extrude it on both parts 100mm as think it’s a good size so hit E on the keyboard when selected object

hit enter and repeat on the bottom section of the file now change view please not i have moved them together for illistations.

Now to make the parts you now want to go to utilities tab select make

select the parts and in chose options as 2 body will need to do this twice.

this next part is as I have set my Prusa slicer to open when I make them so at this point you could save them as stl
now the part is in my slicer i am going to set it up for print by changing position before i save it out as an stl.

first to make it flat to the bed i will use the place on face tool F for a quick keyboard cheat

will select the bottom face

part ready to print in this case going to save it as a stl.

click the part then right-click and select Export as STL
save and parts done. then added them to one file ready to print will show more detailed remixes soon

then its over to the printer via octoprint in my case and away it goes as i have doubled up the parts as to racks going on the wall will take 2hrs to print.

parts all done ready for a test fit.


can find my files here do love a quick 1 day project parts are in to finish off the cr-10 so that should be up soon.
