As i have had some issues with getting my lightburn camera to align and recognise all registration marks in calibration and alignment set up. I have decided i am going to add a better light source and see if this will improve the process.
first of all, i am going to identify current strip is running 12v or 24v or 240v so out with my trusty voltmeter. As i can see a 3 prong pin looks very similar to some i have seen on Amazon or aliexpress so once i know voltages i can look at my options. i am hoping its 12v as then will be as easy as buying a connector and digging out some led tape.
high voltage led strips so i have decided to go down the route of low voltage dimmable LED’s as cheap easy to fit.
Some fun with LEDs
As a maker, i had all the bits, apart from the led tape that i needed to order. So I found a cheap 5m kit off amazon prime as time is always an issue when ordering from China.
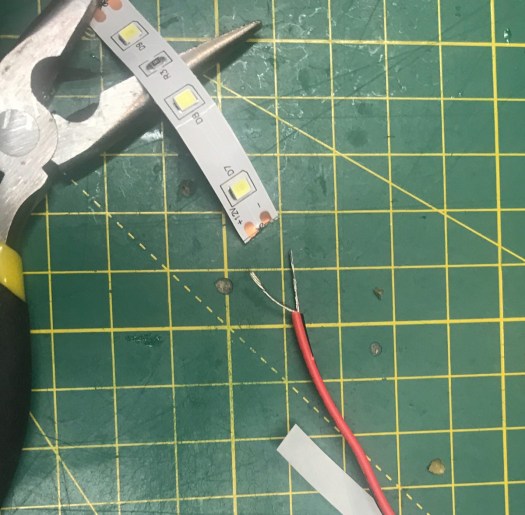
I have 50m of red and black, led wiring cable in my stock of parts. I started off by stripping the wiring off both wires and tinned them, I then took used my flux pen to clean up the terminals and added solder to both solder pads. I then soldered the wires to the pads.
All ready to tin and solder
I then used isopropyl alcohol to clean the area i was going to stick the tape to. I started bottom right worked the tape around the edge of the bed above the rim. Till it had gone around the bed.
all stuck down now to run the wiring
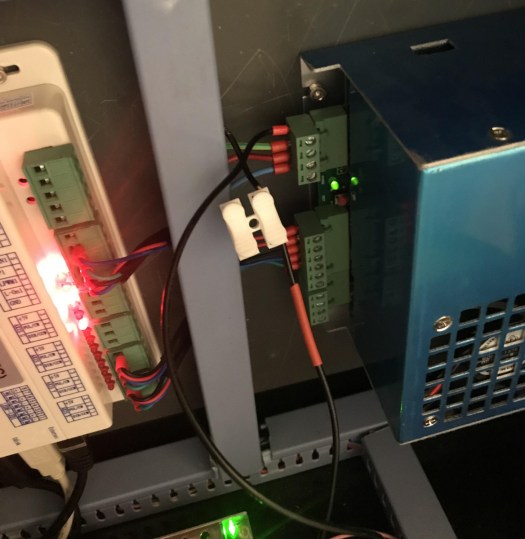
i added cable tabs to so i could keep some cable management i then threaded the wiring through the laser and out through a hole in the floor i then wired up a d 2.1 x 5.5 female connector to the end of the cable.
this is where i connected the dimmer switch and plugged the lighting into the mains
The end result looks good and hoping will cure my lightburn camera issues.
All wired up and working. yes, i will be cleaning my bed this week.
Next up:
I am going to see if i can now calibrate properly using the lightburn camera. if that works fine, I will design a slimline camera mount for the lightburn camera. As an issue with current cameras mount is the laser head hits is when running on the bottom of the printer.
Right as one on my side projects is now done for another month. i can get back to doing enjoyable bits and get to finally clean up my workspace. get everything up and running and ready to work.
So last nights and tonight project is a freebie for my son’s nursery sports day for the toddler group some medals. with the heatwave starting to rush in not sure how much i can do over the next day or so but going to crack on and get the last 28 medals run tonight water temps allowing.
Designed a 2D trophy to give to the toddler and baby rooms of son’s nursery 28 per sheet.
I taped up some 3mm plywood after i had sanded both sides with 400 grit sanding disc. placed it on my honeycomb bed top left. hit play and away the 50-watt laser went. i decided to crudely wire up my water temp gauge the water temp had started out at around 22c when i started to engrave
around 1hr later after the hole sheet had engraved the water temp was up a 29.9c
My temp wired water gauge in side ambient room temp gauge
This is my first attempt at mass production of a product and was an approx 2 hr of engraving and cutting of the medals with the worry of water temp raising 33.2c.
getting hot need a chiller.
this fun little project had given me some worries about water temperatures in the man cave.
I had found an original CW-5000 for £399 they had 11 in stock yesterday went to order today and they have sold out argh so going to bag some ice tonight and add to my distilled water.
Day 2 of opperation sports day medals and getting the mancave to opperatnal .
27 medals to go do love my 50watt laser so reliable fired up laser loaded lightburn put the new sheet of taped plywood and away we go.
final 4 engraving before the cut out pass.
All done and now to take all the tape off them 1 down 37 to go
taken off the tape off yash medal. going to also wipe with wihite viniger.
been a busy night on the tidying the cave now have a clean work bench getting a lot or the draws labeled up as need some organisation in the cave. starting to come together.
That’s me done for the night next operation is sorting the large form printer and my Prusa Mk3 both back online thinking about making some wall mounted spool holders as my enclosed one seem to be jamming up on me. Need to get the CR-10 up and working as well have to calibrate the machine.
Next project on the laser I have a stack of placemats to engrave for our holiday let but going to have to watch the weather and clean out the water tank and replace the dirty water. so will be doing that over the next week will cover the process and the tidying up of the cave at the same time.
but an update is due i have been playing with the map a bit more have offset the roads to make the bolder on the map have also removed some names and features.
Been creative on the design front for some side projects i have been doing with the wife, but frustrating week so far Mondays joy ended in probe acting up have fixed some of my issues with the printer as now got no layer shift as z-axis was not level but will need to do some more debugging of settings have got a profile to try as well but I need to fix the issue with EZABL. the highs and lows of modifing equipment.
Think my EZABL probes gone faulty. I have a few more tests to run before I have to order a new one. but has messed with my schedule a little bit.
I am cracking on as I want to get it fixed did manage to get it to crash into new bed last night so slightly annoyed not much damage.
I hoping it’s not a damaged probe will run the M48 g-code command as this should let me know if the probe has gone to the scrapheap in the sky.
But now for some good news
Have managed to get my Original Prusa i3 Mk3 working again there was 1 bit of broken filament in the bond-tech gearing and one in the sensor now all removed and printing well. So currently turning out upgrade bits for the CR-10 at the moment running squash ball feet for it got one more to run tonight I will then run some other modifications. may invest in the upgrade to an mk3s in the near future. but for the time being, I am happy might raise the z hight by a small bit as looks like it scraping on the first layer a little.
Last night I did manage to clear some more junk from the man cave so getting there just the realisation I have too much stuff as I clear it. but can see the floor again.
Thursday items to do tonight.
So tonight I will Hopefuly have some more tinker time with the probe on the CR-10 and I will be installing team-viewer on the cave computer as then can remotely work on the configuration for OBS and Stream pad as a need to get them up and running ready for streaming.
Whats coming up in the cave over the next week or so.
as I am on a roll of braking/fixing stuff will give the Original Prusa i3 Mk2s mmu ago this weekend as then I will have a mini print farm working hopefully if not I might just turn it back to an Mk2s only and sell on the mmu part of the kit. or buy the Mk2.5s upgrade giving me removable bed and some of the mk3 functions just not the 24v parts.
Just ordered a Honeycomb bed for the 50 watt from aliexpress so should have it in the next week or so. This will help me when cutting of plywood should make it easier to do as can use magnets on warped wood. for acrylic I wills till use standoffs.
EZOUT is on its way over from the USA so waiting for notification of it arriving awaiting customs charges. will cover installing that shorlty and document it.
Fun with CNC machine adding end stops to it before i start to play with it properly.. After I have done this can start playing with some designs I have put together and some ideas i have for fun projects along the way.
Well was a working week in the man cave dident post as gifts for the wife so dident want any spoiler alerts for her.
Monday i remixed the lightburn camera mount as i only had some small screws to fit the mount so resized the hols to 1.2mm and made some cutouts in the base to allow it to fit in the middle of my handle nuts I might change this in the future to have holes through the base but wanted this to be quick and easy so I could calibrate the camera and getting all up and running nice and quickly.
remixed camera base cutting as this is not for looks just cut and glued as needed to get on.Modified Base with cutouts for handle nuts.
I then calibrated the camera in lightburn. this took some understanding but that was down to me not looking at the calibration video on you tube correctly. It worked very well on my second attempt. i then aligned the camera using the alignment patten. once this was done the camera was set up for camera control.
So what is camera control? it’s using the camera to aligned materials for engraving its also used for tracing designs. for example, I wanted a design to be close to the edge of material I am using as didn’t want to waste any. so I updated image this places the image on the background of my work area in lightburn.
Image captured on lightburn camera and design positioned near the edge.Cutting done nice and close to edge of material.Finished voucher for the wife going to make it less sharp if i run it again.
Tuesday
Tonight’s little project was for a game of airsoft I was attending at the weekend. I need to patch for a jacket in hind site I should have just done it straight to the jacket as my sewing skills are not as good.
so i decided to experiment with denim had seen a video online of some one using a fiber laser to age and cut out denim jeans. so this gave me the idea for doing the same to some old jeans i had. i cut a test sample. ran my calibration matrix for it. i dident picture it as was a lot of burn through from anything below 200 mm/s and over 40% power. i setteled on 400 mm/s and 20% power.
using my camera I positioned the cutout piece of jean leg on the table. I then focused the laser. I ran the frame option to double check the position of material and hit play. i had also placed a box around the design an put the power at 40% 20mm/s this cut the denim very cleanly.
think i will now do it directly on the jacket as my sewing skills ere not up to much as image beneath shows.
cannot sew next up will be me doing this directly to jacket.
Wensday
today project were some more gifts for mothers day. so I had brought a load of slate hearts last year when pound land was doing them cheap. so I had a seen a design online so I decided to do something similar I changed the text a bit as the wife does not like mum or mother so mummy it was changed to that.
i then did another screen update to show material on the bed and aligned my design to it last week i ran a test matrix on slate pictured below now it was cheap Spanish slate were as the slate i was using was the more expensive welsh slate but gave me the speed and power.
Cheap Spanish slate hence the browning of sample.
I decided on 65% power with a speed of 400 mm/s as gave the cleanest pass worked a charm. see picture below the final item.
bit of slate engraving
I then decided to run some fun glass coasters for my wife. so did mummy est 2017 coaster and a mummy gin only coaster. decided to used laser bond 100 on one coaster to see what it looked like I settled on the speed of 300mm/s and 55% power as I had run a test matrix as well on glass. I tend to do this on all the materials I own as means get them usually right first time then.
Looks better in the flesh bit hard to photographagain looks better in the fleshdid it in wood to show it off better.
just adding another monitor in the cave and clearing up more as need to make some space so i can get every thing up and running.
going to have a few days off as need some rest and relaxation as got a lot going on in the day job back next week with more fun stuff.
Got my light burn camera with a £21.45 import duty today have decided to go with a different camera mount so it currently printing on the cr-10.
new mount off thingvers
do not like it a nice tight fit but will need alot of sanding to become ajustable so I think I am going to run with a different holder for the camera and cut in out of acrylic tonight.
Next up mA meter i have fitted the mA meter in the housing added the 2 nuts to hold it in the houseing.
Now for the wiring going to run 2 wires through the housing of the laser down to the electronics of the laser. I will then crimp the 2 wires and attach them to the mA meter the + sign side i will attach some red heat shrink to to represent live side.
positive connection cripmedadded some heat shrink to make it easy to identify after threading through the machine.bot ends attached this meter only shows – so that will be going in to the psu
this will attach to the wire i will remove from the psu going to use a terminal block for time being till i decide if i am going to cut a hole in my laser to permanently mount mA meter later on. the – side will go back to the psu.
Wire to remove from laser psuremoved wire joined with temp connector will take the blue covers off tonight and add some as happy it works.Working like a champ.
Now to test doing a test sample on some laser bond 100 with stainless steel as 1 i need to figure out speeds and powers. As i love how the guides all say 100% power and i know that will shorten the life of the tube.
primed in laser bond 100
Tonight will I will do a glass sample tomorrow night will just run raw laser sample as will do laser bond 100 as well another night.
Proves that from 65% power to 20% 400mm/s to 150mm/s works well. yes and i know its not laser ply was tired last night.
Tomorrow night i will be adding light burn camera and hopefully get around to calibration and alignment. will do some cable mangment on my newly installed amp meter.
After being ill for most of the day, I figured out that there is a blockage in my mk3 extruder but was feeling so rough I had to go back to bed. I am feeling a little more human and the wife and son have gone out so have swapped machines. As I need to take the CR-10 for a test drive so printing the mA meter enclosure for the machine and then a light burn camera mount.
cr-10 working great just need to swap the heating bed over
Watching remotely(in the warmth) via octoprint camera only as still need to do a rebuild of octoprint. if all fits will either spray it or reprint in black but for time being.
will post the wiring of the mA meter tomorrow.
5hrs later mA meter housing made going to run the wires thought the back of the enclosure and then down the gap in to the electronics enclosure.
now just finished printing a camera enclosure for the light burn camera that is apparently in the uk just waiting for a custom charge. looks like my pramiters are off by a little just manged to snap bits as i was taking it off the bed. oh well going to ajustaccordinly and re print tommorow.
have had to make some changes as was very weak managed to snap the model pulling it off the bed but tomorrow is another day.
had to do some wiring management with USB from CNC and vinyl cutter so made a start on that and installed another USB hub and Bluetooth dongle so can get some tunes on in the cave my built-in monitor speakers sucks big time. added some Kickstarter linkable speakers which work wickedly.
think the new heat bed and the magnetic bed will be done when I feel a little more human, hope to get this done before I go down to Wales for a long weekend.
Well nearly everything been getting drips and drabs from china over the last week so.
it alive again after year offline.
Cr-10 is working was a corrupted octoprint cusing it to time out so will be rebuilding it. now its working I might as well do some more tinkering so I have ordered solid state relay and a 750 watt silicon heated bed and cork insulation bed. As fed up of the slow heat up time of such a great machine. and a creality magnetic bed so will be stripping down the machine. probably Sunday and upgrading it.
new heated bed and cork insulation new magnetic bedsolid state relay
3D Printing a housing for 30 mA meter to add to the new laser as don’t want to risk frying the tube too quick. Well ifIi can get it to print as just tried to print it without much luck it looks like my bed need to be recalibrated on the prusa mk3 so will do that tommorow. hoping for a Sunday update on that.
New 30 mA meter ready to be wired.printing the new enclosure for the mA meter.Test print of front panel only to make sure it fitted.
CNC machine z tool probe working. need to play with soft limits to stop it crashing but getting my head around Mach 3 which is an epic program but has a lot to get your head around as not as simple as just running your 3d design through a cutter and printing it. but I will get there soon. As someone who loves to modifiy my machines. I am going to add some limit switches. as it doesn’t look that hard to do. Coming soon.
I have remixed a test card for engraving on materials on the 50-watt laser. So I will know speeds and power for my machine done ply and painted ply going to do slate, glass, laser bond 100 on stainless steel and acrylic maybe some laminated acrylic.
laser ply chalk paint calibration sample went with 50% at 300 mms/Cheep slate might try some actual natural slate but looks like 65% 400 mm/s
been doing some custom boxes for friends children so did some chalk painted box and cut some felt out.
two happy girls with there unicorn boxes this was before i cleaned them.
Waiting on the lightburn official camera to get through custom/charges to be issued so I can start using the camera control will make life easier for positioning of work pices.
Right been a long week for me as my boys been ill and teething so not got as much sleep and done as I wanted oh i am also rebuilding my OBS studio ready for some live feeds.
After installing my new 50w last wensday its been a struggle to do stuff with it as little one has been testing at times the but super cute at others lol such is life.
i managed to fire it up Wednesday got a test dot by 11 after getting a lift from a mate in to the mancave basically set it up
Thursday did first popper test was upside down back to front. I asked on the lightburn forum and by morning had a solution that I tested after work this cured the issue as the new machine had a different origin to the old machine. started on first test project worked ok needed to adjust speeds as much faster machine than my k40 so been testing to get the right speeds.
ordered a compatible EPL webcam 3d printed a bracket last night. camera arrived today so this evening fitted it to my laser
have done first calibration of the lens i have since figured out with Windows 10 to configure settings so will run it again as was low rez instead of hd. so will cover this tomorrow. once i have it all set up still works in low rez but want to get it working right before showing it off. i will record whilst cutting so can stream some project in action and also will allow me to align images to material. will put somthingtogetgher next day or so to show it in action
In answer too much, been cleaning on and off an hour or 2 here and there and starting to make a dent. this post has been going on for the last 2 weeks have been updating picutures as i get bits sorted.
Chaos in the man cave. it was alot worse than this as have moved a lot around.
2 rack shelving units to move resize and rewire. one housing my 2 x 3d printers. one housing my CNC router and Viynal cutter/plotter. 3rd work top for my laser cutter.
A this point i realise i have collected alot of stuff let the sorting begin,
Both moved and have changed hight of shelving so bottom parts of the racking can be used for storage and top half for equipment.
Getting there first rack sorted can now see the floor of the work shop.
Right after 2 weeks of 20 / 30 mins here and here it’s getting better just started on wiring last night both working 3d Printers are both wired up just got to add a raspberry pi to each on for printing capture and control.
On to the CNC and vinyl cutter and storage racking. Have moved the shelving up so I can house more storage as space is already tight in my little shed.
moved from on side of the shed to the other have also adjusted shelving positions to allow for more storage.Just needs wiring up have installed power strip ready for plug in later on.
Right just got to wire up the CNC machine and run USB cables for CNC and Vinal cutter back to new workshop computer. It is starting to get to the stage where I can see the floor of the workshop just my desk to sort out and worktop to order for the laser desk. have put my k40 on it for the time being.
this will be going off the for sale pile soon.
just a bit more to sort out. Then find a box to put my out of order prusa in till I am ready to do the Haribo upgrade in the near future.
Last bit of mess to sort out and then ready for some wiring
Well, the count down has started I ordered my K50 Chinese eBay model in the green and black configuration should be arriving at the office on the 4th march just got to get I home.
just ordered my K50 50 watt roll on the 4th march
Now to get ready my old workshop pc had started to fall to bits so time for an upgraded so reconditioned my old gaming server to be my new workshop powerhouse. started to commission it last night swapped it over from the old machine time. will post some more pictures of the work shop once its all fineshed.


You must be logged in to post a comment.