CR-10 fixed don’t know how or why but all back in action god knows what cause of the problem. i ran a m48 probe test spat out some numbers. thought would give it one more go and did some more bed scraping but was for the greater good, i am now running a pre doneprofile with Simplify3D wish me luck. will post picture once it done
Before I fixed the CR-10 I have been running some squash ball feet for the printer, on my Prusa mk3. As they were all done and i managed to pick up some . . squash balls on the way home. AI decided to fit them see if dampeners will help with a ringing issue I have currently on te CR-10
Squash ball feet
nice and easy to fit using printers standard hard ware t-nuts and 4 dunlop double dots
3 feet fited one to go
been setting up my stream pad applications are all set just working what short cuts i am going to need. I have swapped over to streamlabs OBS. so I currently working on a setup just designing scenes for the system. I have written system layout ready so I can figure out what i need to need to buy camera wise and lighting. aiming to get some stuff up soon little nervous about the response I will get to my streaming.
Stream deck
and one finished cube next to 1 and 2 think its the best .
The first one is lasted version of print new profile. as the other 2 are relay wobbly.
now for the gramazon print if all is good or do I wait for EZOUT before I print. something that long as would be an pain in the arse if I run out of filament.
As i was on a roll with squash balls so brought 4 more and printed some more feet for my Mk3 will be fitting them tonight.
Feet for the Mk3
Will be fitting the feet tomorrow as today been with my boy so just been running bits in the background have set 90 % of my stream studio up and the stream deck is coming together.
done some diy cutting of boards and 2 x 4 for a frame im hanging in the cave for new tool rack will take some pictures when its up cheap way to add space
I have printed a frame mounted pi case for the CR-10 that i have modified through breakage so now open frame as the supports popped out the frame when they were removed.
will add some images tomorrow going to set up octopi tomorrow on the CR-10 as will make printing remotely easier also going to do the same for the prusa as have a spare pi kicking around.
Been creative on the design front for some side projects i have been doing with the wife, but frustrating week so far Mondays joy ended in probe acting up have fixed some of my issues with the printer as now got no layer shift as z-axis was not level but will need to do some more debugging of settings have got a profile to try as well but I need to fix the issue with EZABL. the highs and lows of modifing equipment.
Think my EZABL probes gone faulty. I have a few more tests to run before I have to order a new one. but has messed with my schedule a little bit.
I am cracking on as I want to get it fixed did manage to get it to crash into new bed last night so slightly annoyed not much damage.
I hoping it’s not a damaged probe will run the M48 g-code command as this should let me know if the probe has gone to the scrapheap in the sky.
But now for some good news
Have managed to get my Original Prusa i3 Mk3 working again there was 1 bit of broken filament in the bond-tech gearing and one in the sensor now all removed and printing well. So currently turning out upgrade bits for the CR-10 at the moment running squash ball feet for it got one more to run tonight I will then run some other modifications. may invest in the upgrade to an mk3s in the near future. but for the time being, I am happy might raise the z hight by a small bit as looks like it scraping on the first layer a little.
Last night I did manage to clear some more junk from the man cave so getting there just the realisation I have too much stuff as I clear it. but can see the floor again.
Thursday items to do tonight.
So tonight I will Hopefuly have some more tinker time with the probe on the CR-10 and I will be installing team-viewer on the cave computer as then can remotely work on the configuration for OBS and Stream pad as a need to get them up and running ready for streaming.
Whats coming up in the cave over the next week or so.
as I am on a roll of braking/fixing stuff will give the Original Prusa i3 Mk2s mmu ago this weekend as then I will have a mini print farm working hopefully if not I might just turn it back to an Mk2s only and sell on the mmu part of the kit. or buy the Mk2.5s upgrade giving me removable bed and some of the mk3 functions just not the 24v parts.
Just ordered a Honeycomb bed for the 50 watt from aliexpress so should have it in the next week or so. This will help me when cutting of plywood should make it easier to do as can use magnets on warped wood. for acrylic I wills till use standoffs.
EZOUT is on its way over from the USA so waiting for notification of it arriving awaiting customs charges. will cover installing that shorlty and document it.
Fun with CNC machine adding end stops to it before i start to play with it properly.. After I have done this can start playing with some designs I have put together and some ideas i have for fun projects along the way.
After my week end fun of rebuilding my machine and trashing my magnetic bed. i ordered a replacement glass bed with build material on it. an offical creality one.
So to make sure its not 2 of 2 beds destroyed in 72 hrs i am going to start off by upgrading the firmware and re positioning EZABL probe as i just fitted it and never ajusted it.
First things first a bit a prep work as I have a day job. So during my lunch hour I downloaded the latest version of the firmware off TH3Dstuido.com as I have an official EZABL sensor. TH3D_UFW_U1.R2.10.zip is current.
I have unzipped the folder and then uploaded to my dropbox so I can pre-edit all the defined lines on the configuration.h part of the upgrade sketch. One thing to note I have pre-flashed my CR-10 with a bootloader go find a guide on how to do this first if you have not done it.
when you have unzipped the file you will see, OpenFirmwareWindows.bat double click on this file and this will launch the Audrino sketch pad. click on the tab configuration.h
scroll down to your printer model in my case CR-10 then define your settings by removing the // symbols.
as you can see i have set mine to CR10 and OEM Probe Mount .
After making changes save the file and change the in my case I set the board to Sanguino 1284P in tools then hit upload will take a while to compile and then should say the following when done.
system will reboot after flashing
Firmware update all done.
Installing new bed
This was very easy remove glass bed lift it out new on in job done looks very smart. So far it’s works very well still dialling in the setting but Pleased with that it sticks well.
Probe positioning and sensitivity
the probe base should be 2mm higher then the print nozzle approximately so iajustthe the nuts to position it in the right height..
Then using the printer menu i go prepare> move axis>move Z axis>0.1mm enter i then lower the bed till the nozzel is touching the bed.
Nozzle touching the bed with probe 2 mm off the bed
I can now adjust the sensor sensitivity. turning the small screw on the top anti-clockwise till the light goes out. i then slowly turn it clockwise till the light turns back on. sensitivity now set. now I raise the sensor z-axis 2mm off the bed.
Nozzle 2 mm off the bed
Now I go prepare menu scroll down to preheat PLA and heat the bed up only I leave this for 5 mins. to warm up the bed so it’s up to heat. then using the same z-axis movement from the menu and a piece of paper.
I place the piece of paper on the heated bed. I lower the z-axis until there is a slight bit of friction between the paper and the bed. I note the setting of reading -2.01.
click to enter then go to motion menu click to enterclick to exit then go up one screen store settings the you are done
I now exit back to the main menu and go to the control menu>motion>Z probe enter. I then set the setting to -2.01 exit up one menu and store settings. (the setting value will be different on every printer)
that is the z height dialled in now to run auto home and pre heat set up ready for calibration test.
The calibration test.
So going to run 3 calibration test first up is bed test 275mm this will draw 4 squares and lines and logo, this will be followed by a test cube and a torture test.
The 275 calibration test.
Did not run need to get calibration cube right first
The calibration cube test.
cube printed but as you can see there were some issues I have since levelled my z-axis as was slightly off will run again and see if I can get it better might just need the profile adjusted in simply3d I have also just upgraded to the latest version on S3D so will see if that corrects the issue tonight.
The Torture test.
Did not run need to get calibration cube right first
Summery of Monday nights activity’s
New firmware installed with outhitch.
New Bed Installed works well.
Probe hight and sensitivity all set up
Calibration need to try the new version of S3D if not need to tinker with settings or find a better profile.
Right looks like Tuesday will be fixing the issues with the slicer might run some new feet for the printer as well to get rid all vibrations.
This what will most likely happen this week in the cave depending on life as son had a temperature last night hoping its still just teething.
Monday
Monday Night Going to upgrade the firmware on my CR-10 as version TH3D_UFW_U1.R2.10 is out and mine is running a really old version of the TH3D firmware around 1.6. have already installed the boot loader back when I first got the machine. so will be a simple flash.
Will then look at the probe set up as I think it needs some adjustment as was moved from one bracket to and different one and I never adjusted the sensitivity.
then to calibrate Z offset to make sure system functions correctly on the new bed surface without trashing it. like I did to the magnetic bed.
Hoping to get this all done tonght and get a few calibration prints done. Then i can move on to the mods list of parts that i want to print.
New Raspberry Pi 3 frame Mounted Case for CR-10
Chain Support for the Z-axis ( not sure about doing this or not)
EZOUT filament sensor mount cip
I will be adding an EZ OUT filament sensor to the CR-10 shortly as waiting for it to come over from the USA to the UK so maybe the end of the week might be longer.
Tuesday
If all went well on Monday will start first long print on the CR-10 the Gramazon Print for my amazon dot. will be a few days and nights on this one. but will hopefully have a working copy of octoprint up and running so I can set up some time-lapse videos for your enjoyment pleasure. will post a story on it once it’s done.
Wednesday
Tonight operation is to fix my Original Prusa Mk 3 as it got a filament jam in the extruder so will sort this out. pending on temperature in the cave as if it’s below 10c makes life hard to print. as there’s a thermal cut out. roll on summer can print without issue.
Time depending time I am going to have one last go with the Original Prusa i3 mk2s MMU machine that kicking around the cave floor as I have no space to house it. if I can get it working will then make some space to use it. if not going to pull it apart and place it in a box for a project I will do down the line.
Friday
Will be spring cleaning in the cave as have a few hrs to get things ship-shape ready for hopefully a test of the streaming system again pending on how things go this week
Warning Do Not Attempt this if you do not have any wiring knowledge this is done at your own risk as this I a non-approved manufacture item. I will not be held responsible for any damage done to you or your machine this is just covering my arse. But you will be fine as was a doddle to install and now hit 60C in less than 30 seconds. The links are for cr-10 and cr-10s with 310mm x 310mm bed. I have no affiliation with links.
This guide is based off a Nexi tech video i saw on youtube about upgrading the heat bed. my heat bed now heats up in 30 seconds flat the hot end takes a few mins to heat but much better than the 10 mins the heat bad used to take to heat. link to Nexi Tech video
I did have a few issues that are covered in my guide and I would not recommend the Magnetic bed I will be swapping this for creality official replacement bed instead. should have itmonday. will update the review tommorow.
Some wire for low voltage link to the control board.
2.1 x 5.5 connectors male and female for EZABL probe(not needed unless your hard wiring probe)
Pin crimps for the controller board.(Optional)
Tools required.
Soldering iron
Screwdrivers
Alan Keyset
Cleaner suggest isopropyl alcohol
Wire cutters
Small black heat shrink.
Crimper for Pin Connector (optional)
Right first things first I am going to send the z axis up
high to make sure I have everything clear for removing the heat bed.
Z axis raised hight off bed
I have taken the glass bed off I will be removing the current
LokBuild surface off the class and installing the new creative magnetic bed to
replace it. out with the lemonime to remove all sticky stuff. Now the cave smells
of oranges remanence from the Lemonime.
removal of build plate material i am now regretting doing this.
I then removed the 4 screws from my machine. Now you will
notice that I do not have springs on my machine but solid aluminium blocks as I
am using the TH3d EZABL probe I don’t need the adjustments. Also stop it moving
after long prints.
my bed spacers as i dont need to manually adjust time to clean my bed.
I have then removed the heat bed connector from the back of
the control box.
all clean of thermostats and just about to de solder heating wriring
Now to disassemble the heat bed on with my soldering iron to
remove the Red and black wiring. Then removed the thermostat from behind the
heat proof tape. Out with the isopropyl alcohol to clean the bed before I attach
the new silicon heated bed.
Silicon bed stuck on top of original bed
Then added the self-adessive
cork insulation plate on top of the silicon heater.
installed bed then realized my bed bracket will not worktried to cut the cork looked crap so went with putting bed brackets under the cork will replaced some point in the future but for now its fine.
Now for the wiring. I have disassembled the aviation 4 pin connector
and de soldered the wires from the plug. Making note of what pin does what
Pin 1 = Thermostat
Pin 2 = Thermostat
Pin 3 = Heated Bed
Pin 4 = Heated Bed
Then I soldered new heat bed wiring to old and pulled the
new wiring through the wire management sleeve. I then taped the thermostat wires
with old and new and did the same so now the new wiring ins in the sleeve.
I then cut the wires to length and solder them to correct
pins before I do this I have also added heat shrink to each wire to protect
from shorts.
I then re install the bed to the printer adding back my abs printed bed holders and wire management couple of cable ties later and we are ready for the rewiring of the control box. Oh wait one more job.
Time for magnetic bed I have already cleaned the glass off
after last build surface was removed.
I removed the sticky backing of the magnetic bed under sheet
and applied it to the glass centrally re attached the glass to the printer and
placed new build surface to printer.
All done now I can move on to the control box.
I am going to disconnect the wiring from the printer so I can
bring the control box to the work bench.
Now to take it to bits also going to clean up wiring for the
EZABL as power was done in a rush. So going to install a 2.1mm x 5.5 power jack
in the back of the machine from the EZABL probe you wont need to do this but as
I have it in bits going to do it.
Getting started there are 5 screws or hex bits on the bottom
of the control box these need to be removed the bottom cover will now come off.
remove 5 hex screws from around the edge of control box.what you you will see when you remove the metal plate
Next remove 4 screws/hex bits from side of machine this will
release the power supply.
Once they are out you can swing the power supply out.
heat bed wiring removed
Next will need to disconnect the existing heated bed from
the mosfit and power supply. Follow the black and red wires from the aviation
plug to mosfit and to power supply disconnect them.
Then its time to install the Solid-State Relay on the back
of the power supply there are 2 screw holes this is what I have used to affix the
relay.
Taking the red wire from the aviation plug I wire this in to position 1 on the solid-state relay (SSD) position 2 I use a off cut of heated bed wiring to mains power AC positive connector side of the power supply. Then using the black wire from the aviation connector to the ground side of the AC wiring. This gives you a mains supply closed loop.
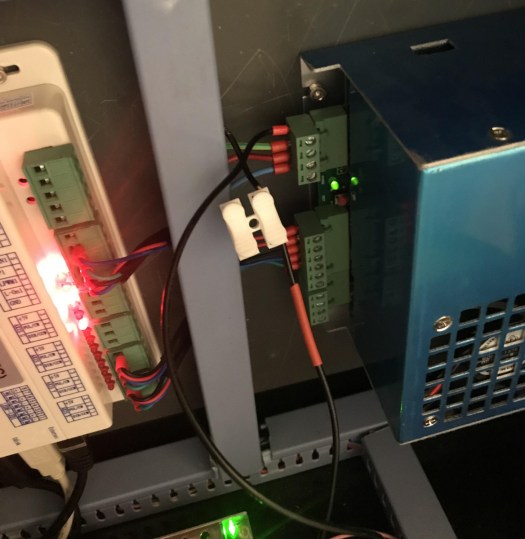
Now to install the wiring that will switch on and off the heat
bed relay. Install 2 wires in to connection 3 and 4 on the SSD these 2 wires
will now be connected to the control board. See image
Remove the 2 wires from the control board and install the 2 control
wires in pin 3 and 4 of the control board bank of 6 screw connectors see image.
You can now de install the mosfit and any wiring connected to it. the 2 wires you removed from the control board can also be removed.
All done but as I am going to install a quick connect for my
EZABL Probe power.
Taking a centre punch and marking a location with no wires
around it I then drill a pilot hole before drilling the 6mm hole for the
connector after installing the connector I bring the solder iron out to solder
power to the connector. From the existing installed wires, the centre pin is
the positive and the outer wall is the negative.
pilot hols drilled not straight i know but its not seen now for a 8mm drill to make the final sizesoldered the connector now to wire them upall wired up
The other end I will solder connector to connect in to it.
now all done time to re assemble calibrate and test.
Nice and neat time to see how she works. A nice quick modification to do. Total cost around £53 and a few weeks of delivery time.
Now, this took a little longer than I thought it would about 2 hrs in total but that was as I was doing other things around the cave. I managed to calibrate the machine yesterday but I will be removing the magnetic bed as its shockingly bad going to order a new glass bed with a coating on it. £28 off Amazon will review that instead, UPDATE: ok it’s not as bad as I thought originally it’s just silly the way it mounts will be running tests but still going with a fixed bed in the meantime will revisit the magnetic bed but got to get some air bubbles out of it. and figure out how to remove the embeded plastic from it.
I am about to run some calibration tests to make sure all is right. Then i have some modparts to run as going to start some long projects on my cr-10 I am going to start on the big print stuff this week hopefully. i have the gramazon print that I have been meaning to run for some time, but never got around to it as printer broke didn’t want to have to print the small parts version.
Next, I have to fix my Original Prusa i3 Mk3 as got a blocked extruder. I will also be printing a Raspberry Pi 3 Mountable enclosure for the CR-10 and rebuilding my pi install. I will also be building a new pie set up for the Prusa Mk3 as looking to be able to monitor all remotely and get some nice time laps for some of my blogging.
So its bye bye to my Budweiser sign for the man cave as i needed the wall space for a second monitor as makes life easier when i am working.
Before the new monitor was installed afterwards will take a better image.
So weekend plans if time permits going to hit my 3d printers as i need to clear a blockage on the Prusa i3 Mk3 extruder and going to swap heated beds on the CR-10 for a silicon heated bed. so should heat up in 30 seconds, not 10 mins.
So when are you going live?
Just need to build my OBS studio and configure my stream deck and we are about good to go live added new camera lighting and mic to the cave. touch would i should have some broadcasts soon as well as my regulare tinkering blog posts.
Well was a working week in the man cave dident post as gifts for the wife so dident want any spoiler alerts for her.
Monday i remixed the lightburn camera mount as i only had some small screws to fit the mount so resized the hols to 1.2mm and made some cutouts in the base to allow it to fit in the middle of my handle nuts I might change this in the future to have holes through the base but wanted this to be quick and easy so I could calibrate the camera and getting all up and running nice and quickly.
remixed camera base cutting as this is not for looks just cut and glued as needed to get on.Modified Base with cutouts for handle nuts.
I then calibrated the camera in lightburn. this took some understanding but that was down to me not looking at the calibration video on you tube correctly. It worked very well on my second attempt. i then aligned the camera using the alignment patten. once this was done the camera was set up for camera control.
So what is camera control? it’s using the camera to aligned materials for engraving its also used for tracing designs. for example, I wanted a design to be close to the edge of material I am using as didn’t want to waste any. so I updated image this places the image on the background of my work area in lightburn.
Image captured on lightburn camera and design positioned near the edge.Cutting done nice and close to edge of material.Finished voucher for the wife going to make it less sharp if i run it again.
Tuesday
Tonight’s little project was for a game of airsoft I was attending at the weekend. I need to patch for a jacket in hind site I should have just done it straight to the jacket as my sewing skills are not as good.
so i decided to experiment with denim had seen a video online of some one using a fiber laser to age and cut out denim jeans. so this gave me the idea for doing the same to some old jeans i had. i cut a test sample. ran my calibration matrix for it. i dident picture it as was a lot of burn through from anything below 200 mm/s and over 40% power. i setteled on 400 mm/s and 20% power.
using my camera I positioned the cutout piece of jean leg on the table. I then focused the laser. I ran the frame option to double check the position of material and hit play. i had also placed a box around the design an put the power at 40% 20mm/s this cut the denim very cleanly.
think i will now do it directly on the jacket as my sewing skills ere not up to much as image beneath shows.
cannot sew next up will be me doing this directly to jacket.
Wensday
today project were some more gifts for mothers day. so I had brought a load of slate hearts last year when pound land was doing them cheap. so I had a seen a design online so I decided to do something similar I changed the text a bit as the wife does not like mum or mother so mummy it was changed to that.
i then did another screen update to show material on the bed and aligned my design to it last week i ran a test matrix on slate pictured below now it was cheap Spanish slate were as the slate i was using was the more expensive welsh slate but gave me the speed and power.
Cheap Spanish slate hence the browning of sample.
I decided on 65% power with a speed of 400 mm/s as gave the cleanest pass worked a charm. see picture below the final item.
bit of slate engraving
I then decided to run some fun glass coasters for my wife. so did mummy est 2017 coaster and a mummy gin only coaster. decided to used laser bond 100 on one coaster to see what it looked like I settled on the speed of 300mm/s and 55% power as I had run a test matrix as well on glass. I tend to do this on all the materials I own as means get them usually right first time then.
Looks better in the flesh bit hard to photographagain looks better in the fleshdid it in wood to show it off better.
just adding another monitor in the cave and clearing up more as need to make some space so i can get every thing up and running.
going to have a few days off as need some rest and relaxation as got a lot going on in the day job back next week with more fun stuff.
Just a quick update as I didn’t do as much as I hoped last
night the joys of life.
As I have decided to go with a predesign from one of the forum members for the light burn camera
I decided to give acrylic a go positioned the design in some 3mm acrylic I had in my stash of laser materials
Fist run did not go so well as stupidly I had forgotten to focus the laser doh second run was perfect.
the 50 watts DSP in action
All cut out find apart from me forgetting to flip the text but having to wait on some screws so will re cut that with a bit of blank I have spare.
have used some 3d printed spacers to hold the work off the bed.
I am also going to modify the design slightly for cable support that will be done with a drill as don’t want to have to bend wiring on jst connectors.
Will do that after I return from a long week end down in
wales.
Think I will be doing more in acrylic think next up will be
some acrylic signs as got some led bases I brought a while back and never got
around to playing with the joys of so many good ideas but not always find time
to do them all.
Got my light burn camera with a £21.45 import duty today have decided to go with a different camera mount so it currently printing on the cr-10.
new mount off thingvers
do not like it a nice tight fit but will need alot of sanding to become ajustable so I think I am going to run with a different holder for the camera and cut in out of acrylic tonight.
Next up mA meter i have fitted the mA meter in the housing added the 2 nuts to hold it in the houseing.
Now for the wiring going to run 2 wires through the housing of the laser down to the electronics of the laser. I will then crimp the 2 wires and attach them to the mA meter the + sign side i will attach some red heat shrink to to represent live side.
positive connection cripmedadded some heat shrink to make it easy to identify after threading through the machine.bot ends attached this meter only shows – so that will be going in to the psu
this will attach to the wire i will remove from the psu going to use a terminal block for time being till i decide if i am going to cut a hole in my laser to permanently mount mA meter later on. the – side will go back to the psu.
Wire to remove from laser psuremoved wire joined with temp connector will take the blue covers off tonight and add some as happy it works.Working like a champ.
Now to test doing a test sample on some laser bond 100 with stainless steel as 1 i need to figure out speeds and powers. As i love how the guides all say 100% power and i know that will shorten the life of the tube.
primed in laser bond 100
Tonight will I will do a glass sample tomorrow night will just run raw laser sample as will do laser bond 100 as well another night.
Proves that from 65% power to 20% 400mm/s to 150mm/s works well. yes and i know its not laser ply was tired last night.
Tomorrow night i will be adding light burn camera and hopefully get around to calibration and alignment. will do some cable mangment on my newly installed amp meter.
After being ill for most of the day, I figured out that there is a blockage in my mk3 extruder but was feeling so rough I had to go back to bed. I am feeling a little more human and the wife and son have gone out so have swapped machines. As I need to take the CR-10 for a test drive so printing the mA meter enclosure for the machine and then a light burn camera mount.
cr-10 working great just need to swap the heating bed over
Watching remotely(in the warmth) via octoprint camera only as still need to do a rebuild of octoprint. if all fits will either spray it or reprint in black but for time being.
will post the wiring of the mA meter tomorrow.
5hrs later mA meter housing made going to run the wires thought the back of the enclosure and then down the gap in to the electronics enclosure.
now just finished printing a camera enclosure for the light burn camera that is apparently in the uk just waiting for a custom charge. looks like my pramiters are off by a little just manged to snap bits as i was taking it off the bed. oh well going to ajustaccordinly and re print tommorow.
have had to make some changes as was very weak managed to snap the model pulling it off the bed but tomorrow is another day.
had to do some wiring management with USB from CNC and vinyl cutter so made a start on that and installed another USB hub and Bluetooth dongle so can get some tunes on in the cave my built-in monitor speakers sucks big time. added some Kickstarter linkable speakers which work wickedly.
think the new heat bed and the magnetic bed will be done when I feel a little more human, hope to get this done before I go down to Wales for a long weekend.


You must be logged in to post a comment.